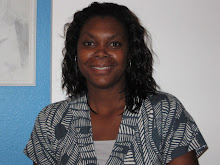
About Me

My photo
I'm a Christ follower, a stay at home mom to 4 kiddos, and wife to a man that I love. I sew and sell girls dresses. Blessings to you. Proverbs 31:24-25 She makes linen garments and sells them. She is clothed with strength and dignity.

Saturday, March 2, 2013

Embroidery Baby!

I have been searching the Internet for months trying to find the best and most affordable embroidery only machines. I Googled, Ebayed, YouTube, Blogged search and store searched simply tyring to get as much info as I could to make a wise decision before I purchased a machine.

I contacted the mother of a friend of mine who does embroidery on shirts, towels, etc. about the kind of machine she uses. She explained that you would want to get a machine that has more than one needle as this makes for quick embroidering. Meaning you won't have to change the thread every time the design calls for a different color. I totally understand that, and so my search continued.

Again I looked for something very reasonable with more than one needle and I could not believe how expensive they are?!! I had a budget that I needed to stick to as close as possible, as this what my Christmas gift and it was going to be a huge purchase just for myself. I don't really like making big purchases especially for myself. Raising 4 kiddos, 2 dogs and a busy husband and being a SAHM, we really try to watch what we spend.

Christmas came and went and so did New Years, and no machine. I tell you I really was nervous about buying such an addition to my sewing family. I already have 3 sewing machines (2 that need to be serviced) and I also have a (Juno by Janome) serger. I love them all!

Finally I came upon this You Tube Video that was very enlightening. This was one of the better videos I have seen, in terms of her using the actual machine I was looking to purchase, and her demonstrations. I really wanted an actual persons view on it and not a company sponsored view.

So without further adue here is my new embroidery baby! The Brother PE 500!!! I think I will call her Pinky or Bessy? She could be a Bessy. :)


Well friends I hope this post has helped anyone else out there who is contemplating getting and embroidery machine. I have not opened her yet, as she has just arrived at my door step.

Please comment and share your thoughts on your machine if you have one or if your  thinking on buying one. Also please share your knowledge on where to get free or inexpensive designs and downloads for the machine.

                                      Happy sewing/Embroidering!
                                                     
                                                        Sandra

Tuesday, December 4, 2012

Crayon roll with art pad.


I have been so busy these past few months, and every time I think of my blog I say "I need to stat posting again" and a few minutes later as I'm distracted by my little ones, The thought escapes my mind and so, another day goes by without posting...But NOT today!!! I decided now is the time. Baby is asleep the washing machine is washing a load and the dishwasher is running. I'm half way there. Anyway enough rambling on. Let's get down to business. LOL!


I was invited to a birthday party for a friend of mine 2 little boys, but was unable to make it. I really wanted to get the boys something but did not know what to shop for. I decided to make them something I think they will like. These crayon roll/art pads are awesome for little ones. Here is a list of where they will come in handy:
1- Trips in the car
2- waiting in the (dreaded Dr.'s lobby)
3- Church (sometimes we keep our little ones with us in church but want them to keep still). I know someone reading this is saying AMEN!!! Trust me I hear you. That's just to name a few...so here is how I made mine.

Supplies:
*3 pieces of fabric each measuring 7 1/2 x 15 1/2
*Rick Rack/trim
*Fusible interfacing 7 1/2 x 15 1/2 (I used fleece fus. int.)
*Ribbon (16in and 13in) 

  Choose your coordinating fabrics and trim. Iron your fabrics so they are nice and crisp/flat.


Thickness
rough side of interfacing. 


smooth side/ rough side


Iron the wrong side of the main fabric to the rough side of the interfacing. Make sure it sticks! Cut off any excess interfacing.


Fold coordinating fabric in half the long way and press. Place this onto the bottom half of the one you just ironed.


Now it's time to mark where you want the crayons to go. starting from the left side mark 1/4, and then every 1"(1/4,1",1",1",1",1",4 1/2, 1", 1", 1", 1", 1", 1/4). Then sew on your marked lines.


It should look like this.


Your coordinating fabric is now sewn to the main fabric that's attached to the interfacing


Place your trim on top of it all and pin all the way around. Clip ends of your rick rack and then burn the ends so they don't fray. Then stitch it all the way around.


Remember how I mentioned earlier about being distracted and forgetting to do something you needed to do. Well that happened again...hence this picture. I got distracted and then came back to sewing and forgot to take pictures as I sewed. UGHH!! So... at this point, you need to place the last remaining main fabric(the back) on top of everything you just did. Right side to Right side and sew through all thickness leaving about a 4" opening to turn it right side out. Clip your corners, then turn right side out. Press (iron) it very good.


Top stitch all the way around making sure to catch that 4" opening


                  This is the finished product. Cute right?!!       


Here are some pictures of others I made later that day. Check out my Facebook page (The Purple Boutique )and hit the page like button and share. Don't forget to shop! :)


 I hope I have inspired you to make  some for your little ones. Trust me when I say they will love them. Also the great thing about these is, when the child gets a bit older and no longer uses crayons, the thin markers or colored pencils will fit perfectly in them. 

                                                  Have a Blessed day y'all.
                                                         Happy sewing!
                                                                Sandra


Wednesday, July 18, 2012

The Christina Dress.


This fabric always caught my eye every time I strolled through the Wal-Mart fabric isles.
I always thought that the fabric was nice, but I did not know how I was going to use it.

That's until I saw my friend Christina Waring a dress that she made for herself. Let me back up a bit... she posted some new pics on FB and I saw her dress.

 At first I thought [hhmmm...that dress is nice, and ugh... the fabric looks familiar].
So I messaged her to find out if the fabric was from Wal-Mart and sure enough it was.

Front

Back (bow)
Ruffle


Let's just say she inspired me to buy that fabric and put it to good use. Hence...the Christina dress.


Here is Christina (and her precious little ones) in the dress that she made.

                                                              
Thank you Friend for the inspiration.

I used McCall's pattern M5791 view D and I made up my own ruffle from some scrap fabric I had sitting around.

I hope after reading this post you too will be inspired to make your little one a dress (or if you don't have a little one just sew something for yourself or someone else.) in this fabric pattern or some other of your choosing.

Happy sewing.
Blessings to you.
Sandra

Saturday, June 9, 2012

Doll Dresses

Sophie's Dresses 

This is Sophie, My daughter's doll.


   #1                                                                          #2                
 
All the dresses that are in this post is made with scrap fabrics. The pattern for the doll dresses I got from this Blog. Scroll down to find the Katie Dress.
For those of you who don't know me well, I will share a secret with you. I'm a very frugal person and I don't like waste.
When you are a sewer like myself, you tend to buy fabrics and after cutting out your patterns you then wonder...what do I do with the scraps?

The following are just one way I use my scraps.
(note: the #'rd pics are all doll dresses)
                              
                                                                                                           #3


                 These are the cherry dresses. I saw this fabric at my local Hancock fabric store
                 and had to get it. For the child's dress I used Simplicity pattern #7189 view B.

#4 
Two Christmases ago I made aprons for all the women in my family. 
This dress was made from one of those left over fabrics that I used to make my
 mother in-laws' apron.

                                                               #5
                        This past Easter I made my daughter a dress using this pretty fabric.

                                                                                         #6
Simplicity Pattern #6877 using view A+B+F 


 #7
 The trim is left over from the Strawberry Shortcake hats I made in a previous post. The dress was left over fabric I used to make my niece a dress this past spring.

                                  #8                                       


                                                                               #9


                                   A skirt I threw together, scraps from a pillow case dress.

                                                                                                                                         #10
This dress was a custom order for a customer of mine.

                                                                                                                        #11
A reversible dress (McCall's pattern #6058 view B.


                                                                                      #12

                                                                                                                         
                                                                                                                                          #13
                       Simplicity pattern #4709 view B


                                                                                                                                     #14


Pillowcase dress.                                                                                              

              
            #15                                                                                             


The doll's dress is the reversible side to the child's dress. 


                                      The floral fabric was left over from a pillowcase dress.

I hope you enjoyed this post, although it was quite long. I hope you were inspired to use up those scraps you may have laying around or tucked in a bin somewhere. Or even better....you will see your fabrics in a whole new light and cut with care.

Happy sewing!!

        Note: visit me on Facebook The Purple Boutique to view the dresses I have for sale.


Related Posts Plugin for WordPress, Blogger...